Friday, May 11, 2012

Make A Mark


Vocabulary:
  • Medium/Media: the actual material used to make the mark
  • Ground: the surface on which you apply the medium
  • Support: whatever the ground is attached to
  • Process: the way you apply the media
Possible Activities
  • Have kids explore and find different things that make marks on a piece of paper
    • Talk about shadows. Even though they are fleeting, do they still count as a mark? The following is a work by Kumi Yamashita who uses unique processes to create incredible art.


  • Read the book, "Seven Blind Mice" by Ed Young
    • What kinds of media did he use in creating this book?
    • What other forms of media would also work?
    • Have the kids create their own book to explore the uses of different media. 
    • Check out the following video for own example of how a child recreated this story by using their own art and recording it.


Example media/ground/support/process:

MEDIA
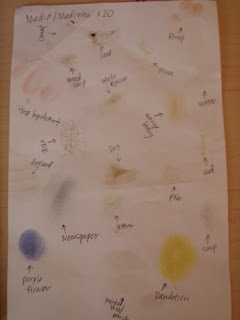
There are so many different forms of marks--
allow the kids to think outside the box and have fun with it.
  • cement
  • leaf
  • rust
  • wood chip
  • white flower
  • pine
  • water
  • fire hydrant
  • rock
  • dry leaf
  • dirt
  • grass
  • newspaper
  • purple flower
  • dandelion
  • soap
PROCESSES
  • Flick with brush
  • Rolling a tire with paint
  • Throwing medium at ground
  • Computer program
  • Covering ground with medium then scrape away what you don't want
  • Attach crayons to bottom of door, open and close the door
  • Blowing paint/watercolor
  • Draw/paint with pen in mouth
  • Apply medium to one side of paper, fold in half
  • Apply medium to cloth, whip your ground with the cloth
SUPPORTS
  • earth
  • computer monitor
  • refridgerator
  • computer keyboard
  • house
  • lamp
  • chest of drawers
  • clock
  • tree
  • table
GROUNDS
  • particle board
  • metal
  • CD case
  • clothes
  • light bulb
  • milk jug
  • pillow case
  • computer screen
  • dirt
  • rock

Friday, May 4, 2012

Paper Doll

Lesson Plans

    • Math Connection: 
      • Learning different geometric shapes for body parts. Discuss what shapes work for body parts.
      • Make a doll that is proportional to your own. 
    • Molly Bang's "Picture This": What do certain shapes mean to you? Why? Does round always mean safe and pointed always mean scary and unsafe? What about round? How do you create emotion with shapes?
    • Geography Connection: Flat Stanley; be socially engaged with your paper doll. Document your experience with him/her. 

Materials
    • Paper Doll: cardstock (recycled manila folders), white glue, hole punch, scissors, toothpick, back of pencil
    • Transferring: Chartpack "blender" pen; graphite  

Techniques
    • Hinged paper doll without brads
      1. cut out shapes for body parts
      2. hole punch the piece that will be in the back
      3. when the pieces are set, place a small dab of white glue in the center of the punched hole with a toothpick 
      4. cut out a piece of cardstock that is big enough to cover the hole and overlap a little
      5. place the piece mentioned in the previous step on the hole where the glue was applied
      6. use the back of a pencil to hold in place for 30 seconds
      7. be gentle, but check to see of the parts move
    • Transferring images 
      • Using Blender Pen
        1. cut out image
        2. place face down on the surface that you are transferring to
        3. hold steady while coloring the back with the blender pen
        4. when image becomes hazy, lift one corner to check transfer
        5. if the image transferred successfully, remove the original image
        6. if not, continue coloring with the pen until the image transfers
      • Using Graphite
        1. color the back of an image with graphite
        2. place with the graphite down on the surface that you are transferring to
        3. trace image with a pen/pencil to transfer the graphite on the back to the application surface

Back of Paper Doll using "brad-less" technique

Finished Paper Doll Example